Your Base puts its output straight into your stock, every other building keeps it on site. You can fetch the resources yourself, or let a cart haul them along a transport route. Here is how to set one up, step by step. How fares work, how a cart loads and which carts exist is explained on the Resources & Production page.
Only your Base fills your stock. Resources reach your stock only when a cart unloads them at your Base or when you pick them up in person. Warehouses, farms, mines and processing buildings keep their own storage, so a route that ends at a warehouse is just a stop on the way.
What you need
- A workshop to craft the cart in.
- Two of your buildings with storage: where the cart loads (a farm or a mine, say) and where it unloads (only your Base fills your stock, a warehouse or a processing building is a stop on the way). The cart has to be able to cover the distance between them.
- Gold for fares. The handcart travels for free, every other cart pays for each leg.
1. Craft a cart
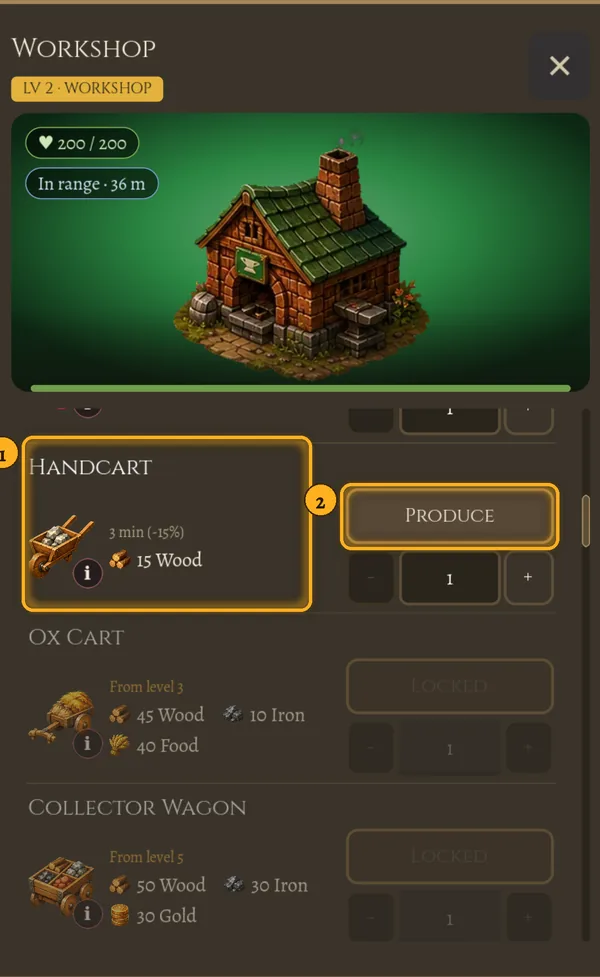
Open your workshop and switch to the Production tab. Find the cart you want (1) and tap Produce (2). For nearby mines the handcart is enough, and it travels for free. Carts your workshop is not high enough for yet are greyed out and show the level they unlock at.
2. Pick up the cart
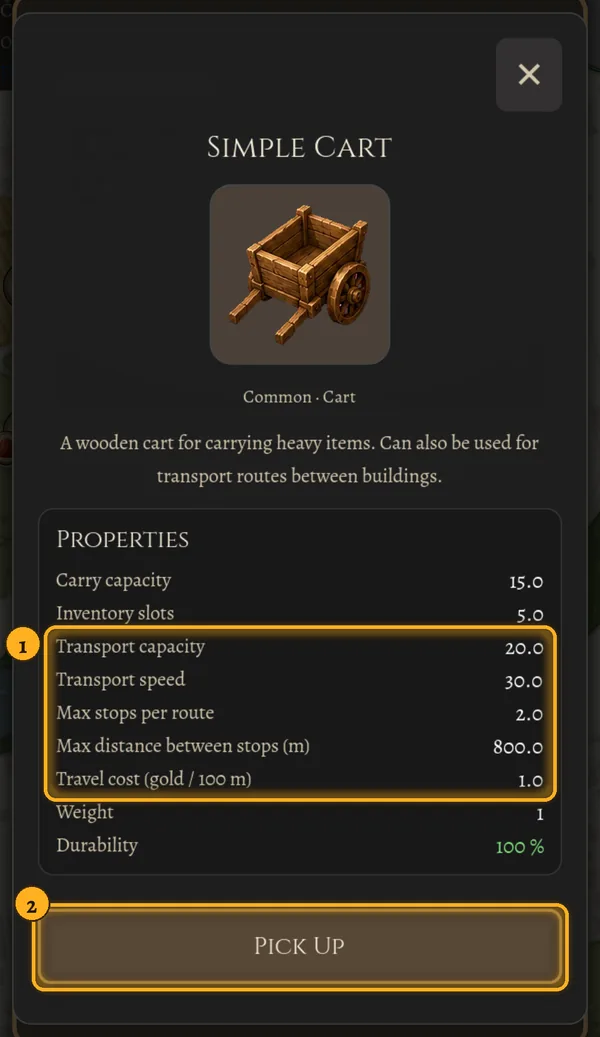
A finished cart stays in the workshop inventory. Switch to the Storage tab, scroll down to the inventory and tap the cart. Its detail shows how much it carries, how fast it goes, how many stops it serves, how far apart the stops may be and what a trip costs (1). Tap Pick Up (2) and your hero takes the cart along.
A cart for a route has to be in your hero's backpack or in the inventory of the building the route starts from. A cart equipped on your hero (it raises carrying capacity) does not count for routes.
3. Start the route where the cargo is
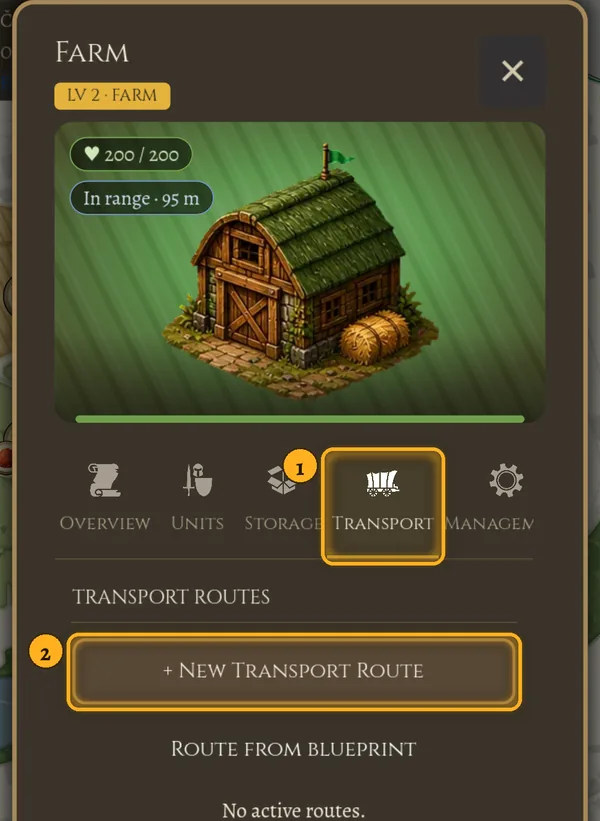
Walk to the building you want to haul resources from and open it. On the Transport tab (1) tap + New Transport Route (2). The button works only within the building's range. Below it is Route from blueprint, for when you have a route saved.
4. Choose the cart
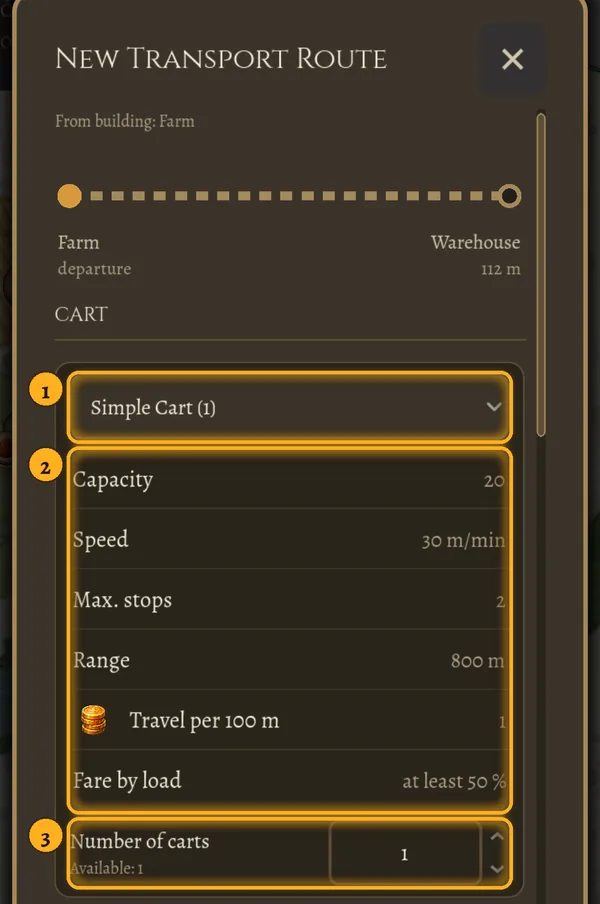
At the top of the route window, pick the cart (1). The number in brackets is how many you have. Below are its stats (2): capacity, speed, how many stops it serves, its range between stops and the travel cost. With Number of carts (3) you can put several carts of the same type on the route. They travel together and their capacity adds up.
5. Set up the stops
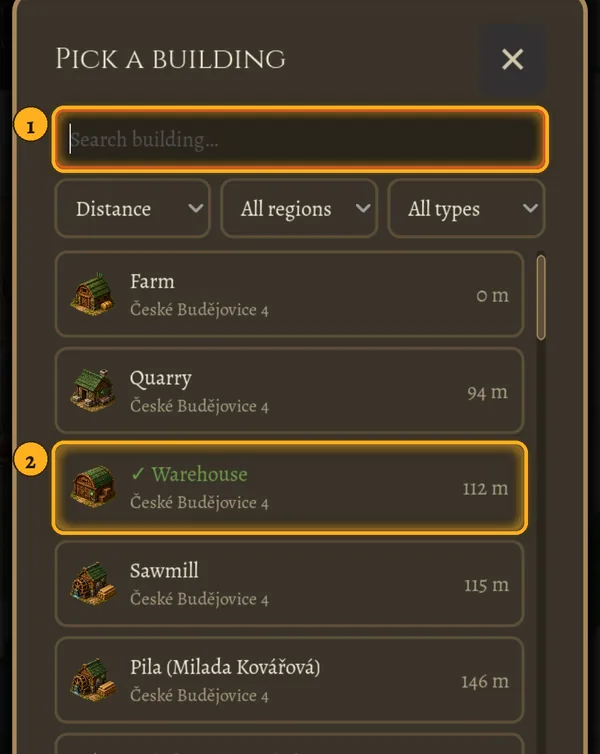
The first stop is always the building you create the route in. For the second stop, tap the building field. A list of your buildings opens, where you can search (1) and sort by distance. Tap the destination (2).
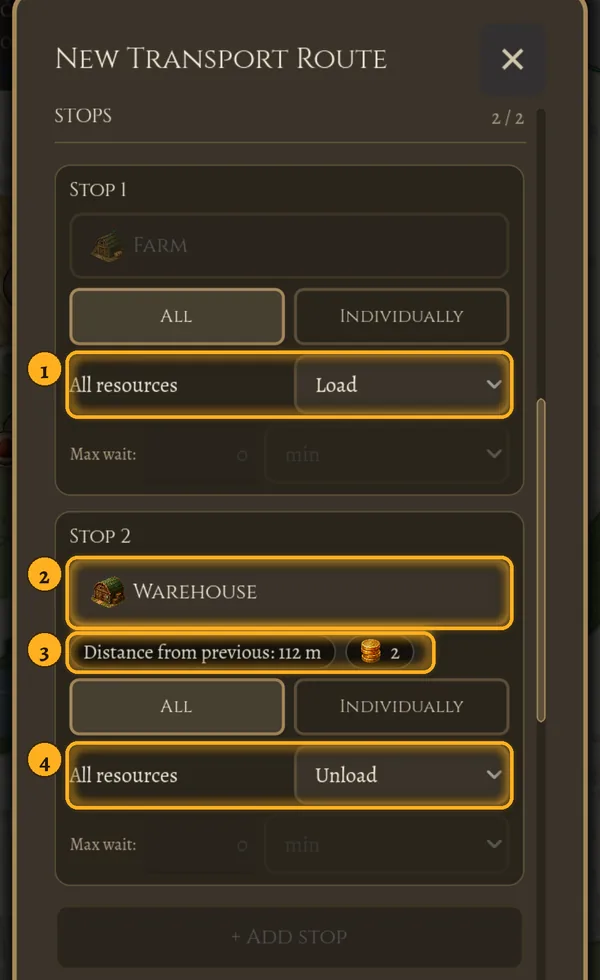
Then decide what happens to the resources at each stop. With All one action applies to every resource, with Individually you set each resource on its own, with a limit. Let the cart load at the first stop (1) and unload (4) at the second stop (2). Under the second stop you see the distance from the previous one and the price of the leg (3). What Load what fits, Load to full, Unload what fits and Unload all do exactly is explained on the Resources & Production page.
A cart that serves more stops gets them with + Add stop. From three stops on you also choose the mode: ping-pong (there and back) or loop.
In the picture the farm hauls to a warehouse that collects from the buildings around it. For resources to reach your stock, the stop where they are unloaded has to be your Base. Another route then takes them from the warehouse to your Base, or you pick them up.
6. Escort, reserve and creating the route
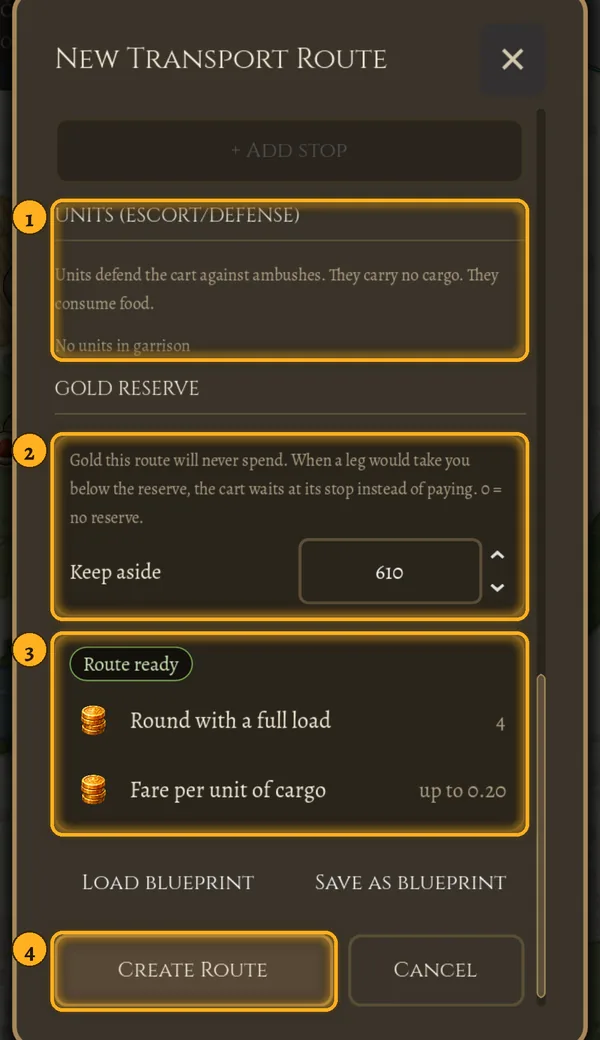
At the bottom of the window you can give the cart an escort from the units stationed in the building (1). They protect it from ambushes, carry nothing and eat food. The gold reserve (2) is an amount the route never spends: rather than dip below it, the cart waits. The summary (3) tells you whether the route is ready, what a round with a full load costs and what you pay to move one unit. When something is missing, the summary says what. Finally tap Create Route (4).
Save as blueprint stores the route, and in another building you set it up with one tap through Route from blueprint.
7. Watch the route run
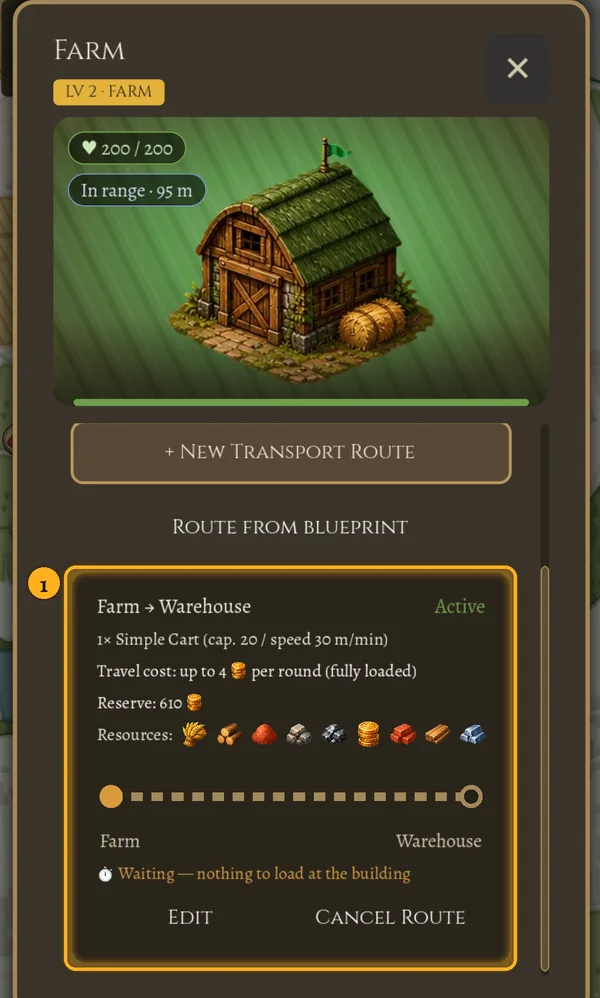
The finished route shows up on the Transport tab of every building it passes through (1). The card shows the route status, the cart, the cost of a round, the reserve, the resources it carries, where the cart is right now and what is on board. When the cart waits, the card says why, for example that you are out of gold or that the destination is full. Edit changes the stops (you have to be at the building), Cancel Route ends it and the cart drops its cargo in a building on the route.
All routes in one place
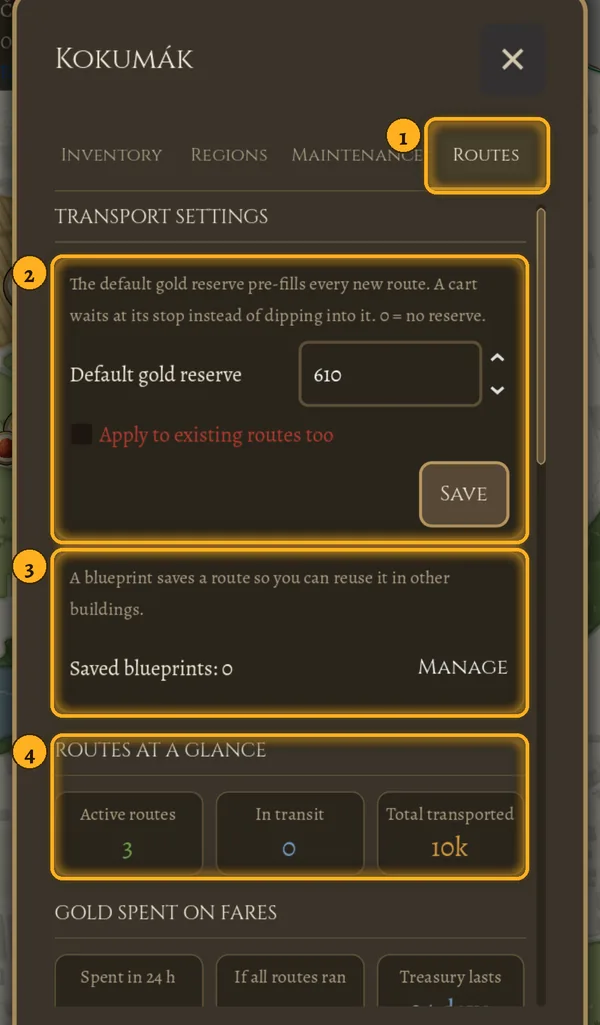
Tap Overview in the top bar and switch to the Routes tab (1). Here you set the default gold reserve for new routes and can apply it to routes that are already running (2). You manage your saved blueprints (3) and see a summary of all routes, how many carts are on the road and how much gold goes on fares (4). You can pause or cancel a route from here even when you are nowhere near its stops.